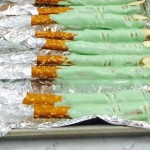
Witch’s Fingers

Witch's Fingers
Last Saturday at our East Cobb store, Chef Stephanie Smithmyer led the "Frightfully Fun Foods" class for kids ages 6 to 9. Our young chefs had a chance to make and enjoy a variety of Halloween-themed recipes such as Eyeball Sliders, Ghoulish Ghoulash, and these tasty (and spooky) Witch's Fingers! Join in on the fun! We have more kids classes coming up this fall. Topics include At-Home Asian, Soups and Sammies, Knife Skills for Teens and Tweens, Holiday Cookie Decorating, and Holiday Treats to Share as gifts - and more!
Write a review
Print
Prep Time
25 min
Cook Time
10 min
Total Time
35 min
Prep Time
25 min
Cook Time
10 min
Total Time
35 min
Ingredients
  1. 10 pretzel rods
  2. 1 bar of Baker’s white chocolate
  3. 3-4 drops green food coloring
  4. 1 drop of yellow food coloring
  5. 10 sliced almonds
  6. Toothpicks
Instructions
  1. Wrap the ends of the pretzel rods with tin foil, about 2 inches from bottom.
  2. Chop the white chocolate and place in a metal or glass bowl over a pan of simmering water, stirring occasionally. Add the green food coloring and a drop of yellow to get the right color of green. Pour chocolate into a small sheet pan.
  3. Roll the pretzel rods around in the chocolate to cover completely. Place on another parchment lined sheet pan. Place a sliced almond on end of rod to form fingernail. Take a toothpick and make a couple of lines in two places on rod to make knuckle lines.
  4. Let chocolate cool and set up. Remove foil from end so you have a spot to hold your hand to eat your finger!
Recipes from Cooks Warehouse https://recipe.cookswarehouse.com/
Posted in Appetizers, Desserts, Recipes | Tagged , | Comments Off on Witch’s Fingers

Wild Rice, Pear and Roasted Sweet Potato Salad with Walnuts

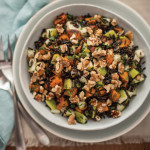
Wild Rice, Pear and Roasted Sweet Potato Salad with Walnuts
Serves 6
Thanks to chef and cookbook author Robin Asbell for this healthful, seasonal recipe that is sure to find its way to your dinner table this fall. Take a break from your usual mashed potatoes or yams and try this sweet and savory treat instead. Want to learn how to prepare more delicious, whole grain recipes and jump start a healthier diet? Join Robin for her 2 classes at The Cook's Warehouse on November 5 and November 7, both featuring recipes from her new cookbook, The Whole Grain Promise. From breakfast to dessert, you'll learn how to cook and enjoy more whole grains.
Write a review
Print
Prep Time
25 min
Cook Time
1 hr 30 min
Total Time
1 hr 55 min
Prep Time
25 min
Cook Time
1 hr 30 min
Total Time
1 hr 55 min
Ingredients
  1. 3 cups water
  2. 1 cup wild rice or a rice blend
  3. 1 pound sweet potato, cubed (4 cups)
  4. 4 tablespoons extra-virgin olive oil, divided
  5. 1/2 cup fresh parsley leaves, chopped
  6. 2 large scallions, chopped (white and green parts)
  7. 2 medium ripe pears, cored and chopped
  8. 1/4 cup freshly squeezed lemon juice
  9. 2 tablespoons Grade B maple syrup
  10. 1/2 teaspoon salt
  11. 1/2 teaspoon freshly ground black pepper
  12. 1/2 cup walnut pieces, coarsely chopped
Instructions
  1. First, cook the wild rice. Truly wild rice and cultivated wild rice have very different cooking times. Add the water to a 2-quart pot and bring to a boil. Add the rice and return to a boil, then reduce the heat to a simmer and cover the pot. For hand-harvested wild rice, start checking in 20 minutes. Cultivated rice may take 45 minutes to 1 hour. When the rice is tender and just starting to split apart at the ends, drain well. Let cool.
  2. Preheat the oven to 400°F. On a large sheet pan, toss the sweet potatoes with 1 tablespoon of the olive oil. Roast for 20 minutes, stir, and then roast for 10 minutes more, depending on the size of your cubes. When the cubes are easily pierced with a paring knife, they are done. Let cool to room temperature.
  3. In a large bowl, combine the wild rice, sweet potatoes, parsley, scallions, and pears. In a small bowl, whisk together the remaining olive oil, lemon juice, maple syrup, salt, and pepper. Pour the dressing over the wild rice mixture and toss to coat.
  4. Serve topped with walnuts.
  5. Keeps for 2 to 3 days, tightly covered, in the refrigerator. If you want to store it longer, wait to chop the pears until just before serving.
Notes
  1. Reprinted with permission from The Whole Grain Promise © 2015 by Robin Asbell, Running Press, a member of the Perseus Books Group.
  2. Photo © 2015 by Steve Legato
Adapted from The Whole Grain Promise
Recipes from Cooks Warehouse https://recipe.cookswarehouse.com/
Posted in Dinner, Lunch, Pasta | Tagged , , , , , | Comments Off on Wild Rice, Pear and Roasted Sweet Potato Salad with Walnuts

Butternut Mac and Cheese by Ree

Butternut Mac and Cheese by Ree
Serves 4
This Saturday, October 17, is National Pasta Day! And no pasta dish is as widely adored as good old "mac and cheese". We love this fall makeover of the classic from The Pioneer Woman, Ree Drummond. Want to learn how to make pasta from scratch, along with lots of new and fun pasta recipes? Sign up for an upcoming pasta class, we have one on October 20 in East Cobb, one on November 3 in Decatur., and one on November 10 in Midtown.
Write a review
Print
Prep Time
15 min
Cook Time
1 hr 10 min
Total Time
1 hr 25 min
Prep Time
15 min
Cook Time
1 hr 10 min
Total Time
1 hr 25 min
Ingredients
  1. 12 ounces (by weight) Macaroni
  2. 1/2 whole Butternut Squash
  3. Olive Oil, For Drizzling
  4. 2 whole Yellow Onions, Sliced
  5. 8 Tablespoons Butter
  6. 2 Tablespoons Flour
  7. 2 cups Whole Milk
  8. Salt And Pepper
  9. 2 cups Grated Sharp Cheddar
  10. 1/2 cup Seasoned Breadcrumbs
Instructions
  1. Cook the macaroni until al dente. Drain, rinse with cold water to stop the cooking process, and set aside.
  2. Preheat the oven to 400 degrees. Carefully cut a whole butternut squash in half lengthwise. Drizzle half the squash with olive oil and place it on a rimmed baking sheet, cut side up. Roast it in the oven for 20 to 25 minutes until fork tender, watching it to make sure the surface doesn't get burned (it should have some brown areas.) Store the other half of the squash in the fridge for another use. When the squash is roasted and tender, scrape out the flesh and mash it with a potato masher. Sprinkle it with salt and pepper and set it aside.
  3. While you're roasting the squash, add the onions and 2 tablespoons of the butter to a large, ovenproof skillet over low to medium-low heat. Stir occasionally, cooking the onions until they're deep golden brown. Remove them to a plate and set them aside.
  4. To the same skillet you used to cook the onions, melt 4 tablespoons of the butter over medium-low heat. Sprinkle over the flour and whisk it to make a thin paste. Cook it for 2 minutes, then whisk in the milk. Cook it, whisking gently, for a couple of minutes or until slightly thick. Taste and adjust seasonings. You'll probably want to add more salt!
  5. Turn the heat to low and stir in the mashed butternut squash. When it is warmed, stir in the cheese. If the sauce is overly thick when the cheese is melted, add a splash of milk. Keep stirring until the sauce is nice and hot, then stir in the macaroni. Taste and add more salt if needed.
  6. Melt the remaining butter and combine it with the breadcrumbs. Sprinkle the breadcrumbs over the macaroni and bake it (I do it straight in the skillet!) at 400 degrees for about 15 minutes, or until the crumbs
  7. Serve immediately!
Notes
  1. © 2015, The Pioneer Woman | Ree Drummond. All rights reserved.
Recipes from Cooks Warehouse https://recipe.cookswarehouse.com/
Posted in Cheese, Pasta, Recipes | Tagged , , , | Comments Off on Butternut Mac and Cheese by Ree