
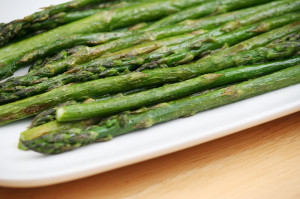
Asparagus with Honey and Sherry Vinegar

Asparagus with Honey and Sherry Vinegar
We received an email last week from a customer by the name of Lynne. She was hoping to track down a recipe from a recent cooking class that her husband attended with Chef Nancy Waldeck, as she had misplaced her copy. Once we saw Lynne's note that this was "the best asparagus I've ever had", we knew we had to quickly find the information for her! We were encouraged by Lynne to make these at home, and agree that it has amazing flavor! What better time to try this easy, delicious and healthful recipe than while asparagus is at it's peak?
Write a review
Print
Prep Time
15 min
Cook Time
30 min
Total Time
45 min
Prep Time
15 min
Cook Time
30 min
Total Time
45 min
Ingredients
  1. 1 ½ LBs Fresh Asparagus, trimmed
  2. 4 TB EVOO, divided
  3. 1 ½ Tsp Honey
  4. 3 TB Sherry Vinegar
  5. 1 tsp Dijon Mustard
  6. Sea Salt and Freshly Cracked Black Pepper
Step One
  1. Toss the Asparagus in 1 TB EVOO and season with salt and pepper. Grill or Broil the asparagus until crisp-tender
Step Two
  1. In a bowl or jar combine the remaining oil, honey, vinegar and mustard together. Top the asparagus with the dressing and season with salt and pepper to taste.
Notes
  1. Recipe used with permission. Copyright Chef Nancy Waldeck/Taste and Savor
Adapted from Taste and Savor Delicious Healthy Recipes & Tasty Wine Tips
Recipes from Cooks Warehouse https://recipe.cookswarehouse.com/
Posted in Vegetables | Tagged , , , | Comments Off on Asparagus with Honey and Sherry Vinegar

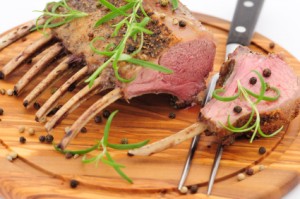
Rack of Lamb with Mint Sauce in a Sous Vide

Rack of Lamb with Mint Sauce
Serves 4
Interested in learning more about the sous vide method of cooking that you see on TV and in restaurants? Cook like a pro! Join us on March 31 for a Get to Know Sous Vide Hands On class that explores this method of cooking that's been popular in France for decades and is gaining more popularity here in the states. It's a fantastic way to prepare everything from meats and seafood to eggs and vegetables. Below is a great recipe for springtime lamb that utilizes a sous vide oven.
Write a review
Print
Prep Time
30 min
Cook Time
4 hr
Total Time
4 hr 30 min
Prep Time
30 min
Cook Time
4 hr
Total Time
4 hr 30 min
Lamb
  1. 2 lamb racks, Frenched (or 12 meaty t-bone lamb chops)
  2. Salt and pepper to taste
Herbed Butter
  1. 2 tablespoons (30 ml) butter
  2. 1 clove garlic, peeled and pressed
  3. 1/2 teaspoon (2.5 ml) onion powder
  4. 1 teaspoon (5 ml) fresh rosemary leaves, minced
  5. 1 tablespoon (15 ml) grated Parmesan
Mint Sauce
  1. 2 tablespoons (30 ml) fresh mint leaves, minced
  2. 1/3 cup (2.6 fl oz/77 ml) apple cider or red wine vinegar
  3. 2 teaspoons (10 ml) sugar (or 1 packet sweetener)
Lamb
  1. Fill and preheat the water oven to 134°F/ 56.5°C.
  2. Sprinkle both sides of the racks or chops liberally with salt and pepper.
  3. Put each lamb rack (or 3 to 4 chops) into a small (1 quart/.9 liter) food-grade cooking pouch and vacuum seal.
  4. Submerge the food pouches in the water bath and cook for at least 11/2 hours (but up to 4 hours will not affect the texture of the meat.)
Mint Sauce
  1. Whisk all ingredients together in a small bowl.
  2. Let the sauce sit at room temperature for 15 to 20 minutes to allow flavors to blend.
To Finish the Lamb
  1. At the end of the lamb’s cooking time, melt the butter and combine with all remain¬ing herbed butter ingredients.
  2. When ready to serve, remove the lamb from the pouches, pat the surface dry, and brush all over with the herbed butter mixture.
  3. Sear the lamb quickly on one side in a hot skillet or for about 3 minutes under the broiler. (Sear the rack meaty side down in the skillet or meaty side up under the broiler.)
  4. Slice the rack into chops and top with Fresh Mint Sauce, if desired.
Adapted from from the Sous Vide Meat cookbook
Recipes from Cooks Warehouse https://recipe.cookswarehouse.com/

Posted in Lamb | Tagged , , | Comments Off on Rack of Lamb with Mint Sauce in a Sous Vide

Queso Fresco Mexicano

Queso Fresco Mexicano (Fresh Cheese)
Yields 1
One of the sessions that Wendy attended at the IACP Conference was titled "Artisanal Cheeses of Mexico". The panel that led this educational session was made up of Greg O’Neill, president of the American Cheese Society and co-founder and owner of Pastoral Artisan Cheese shops in Chicago; Carlos Yescas, founder and co-owner of Lactography; and Chef Rick Bayless, chef, author, TV host, and expert in Mexican cuisine. Chef Bayless shared this recipe for Queso Fresco, which was demonstrated and tasted in class along with Quesillo de Herba and Cotija de Origen.
Write a review
Print
Cook Time
5 hr
Cook Time
5 hr
Ingredients
  1. 1 gallon whole or 2% milk—preferably from a small local dairy with grassfed cows: the richer the flavor, the better the cheese
  2. 2 cups buttermilk
  3. 1 teaspoon citric acid (aka sour salt)* OR 1 cup fresh lime juice
  4. 1 teaspoon salt (pure fine-ground sea salt works best here)
Instructions
  1. Culture the milk. Pour the milk into a large (at least 8-quart) pot—I typically use an 8-quart enameled cast iron Dutch oven or a stainless steel 12-quart stock pot. Stir in the buttermilk, attach an accurate thermometer that registers temperatures as low as 75 degrees and set the pot over medium heat. When the temperature reaches 75 degrees, turn off the heat, cover the pot and let stand 3 or 4 hours.
  2. Set the curd. If using citric acid, stir it into 1/4 cup cool water, continuing to stir until dissolved. Uncover the pot, set over medium heat and stir in the dissolved citric acid or the fresh lime juice. You will immediately see small curds start to form. Every couple of minutes, stir slowly, gently and thoroughly over the entire bottom of the pot until the milk reaches 195˚F—it’ll take just over 20 minutes. At this point the curds will very obviously be floating in the milky-transparent whey. Remove from the heat and let stand 5 minutes without stirring.
  3. Drain the curd from the whey. Wet a large piece of cheesecloth and drape it into a large colander. Set the colander in the sink. Using a large slotted spoon or a fine-mesh skimmer, carefully ladle all of the curd into the colander. Gather the cheesecloth up around the curd and gently press with the back of a large spoon to expel a bit more whey. Unwrap the curd onto a plate, break it up and sprinkle with 1 teaspoon of the salt. Work in the salt with a spoon or your fingers.
  4. Finish the cheese. Gather the cheese curds into a 1-inch-thick disk, transfer to a plate, cover and refrigerate until thoroughly chilled. The cheese should last about 1 week in the refrigerator.
Notes
  1. Sour salt is available in the kosher section of many grocery stores or online
Adapted from Season 7 of Mexico - One Plate at a Time
Recipes from Cooks Warehouse https://recipe.cookswarehouse.com/
Posted in Cheese | Tagged , | Comments Off on Queso Fresco Mexicano